Part 5: Integration of previous methodologies

Integration of previous methodologies

Introduction

Based on the previous parts, the following part contains example exercises for how to combine these different methodologies into one coherent approach to training and community action. While we formerly discussed art-based learning, creative tinkering, and sustainable fashion separately, these approaches can easily overlap and enhance each other. Designing clothing is inherently a creative process and a means of expression. Incorporating ABL or creative tinkering into the design process or using fashion design as the artistic activity for educational services comes to mind quite naturally.

We have compiled 14 exercises that are to inspire readers as to the possibilities of the FABLE approach and how to implement it. These combine two or all three approaches to showcase the synergies.

While all of the following exercises incorporate the ideas of creative activities and sustainability, they have been grouped according to the aspect they focus on, to allow users to better find exercises more suited to their needs.

G-Local Hubs and Social Entrepreneurship

Based on the methodology at the core of FABLE project, these exercises explain how to establish your own G-Local Hub, as well as how to conceptualise your own social business.

The FABLE project supports the development of inclusive spaces for young people where soft skills, creative learning and social entrepreneurship is stimulated. They are the G-local Hubs which are short term workshops for young people and encompass different sets of techniques and experiences developed based on the content presented and the interested learners (you!) involvement in the previous e-learning units. By merging the previous methodologies, we present to you some creative processes that can be used to promote creative entrepreneurship and sustainability in the field of youth.

G-local indicates a global impact of an action that takes place locally. Here, we present to you a process that was already introduced briefly in the second unit but which now can be used as a tool to help a youth worker develop a creative space for youth, i.e. a g-local hub.

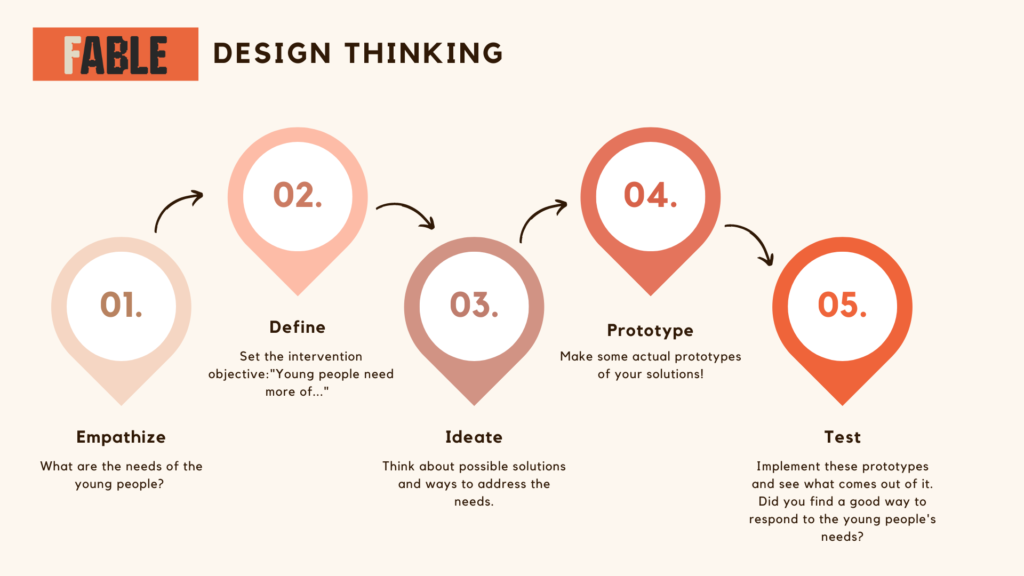
Youth workers and other people working in the field of youth, first, will need to communicate with the young people or even consult each other, learn about their needs (step 1) and then define the specific objectives they would like to address through the organisation of a g-local hub (step 2). After defining the aims, they can continue by proposing ideas on how to fill this space with creative activities that address the needs of the young people. This might mean that they could create clothing stations, organize seminars on sustainability and sustainable fashion, build creative stations for experimentation, host clothing swap parties, anything that they could think of (step 3). Such ideas could work as single activities or they could also be combined together. It is up to you to decide and create a prototype of the g-local space (step 4). Finally, you can test your prototype or prototypes, if they are more than one, to see if there are things that could be changed, excluded or included in the design of the g-local space. You can test it with your colleagues or even invite young people to experiment a bit with this idea and collect their impressions.

The same process can be applied by the young people themselves (remember the participatory planning introduced at the end of the second unit!) in order to help them create their own idea of intervention for promoting sustainability which could lead to creating and promoting a sustainable fashion product or even a sustainable fashion business! Young people can follow the same process but in this case, they will have to respond to their own personal needs connected to sustainable fashion and entrepreneurship. Some basic knowledge that is already provided in the fourth unit of this e-learning course will be essential to become confident with sustainable fashion, circular economy and social entrepreneurship  terms and issues.

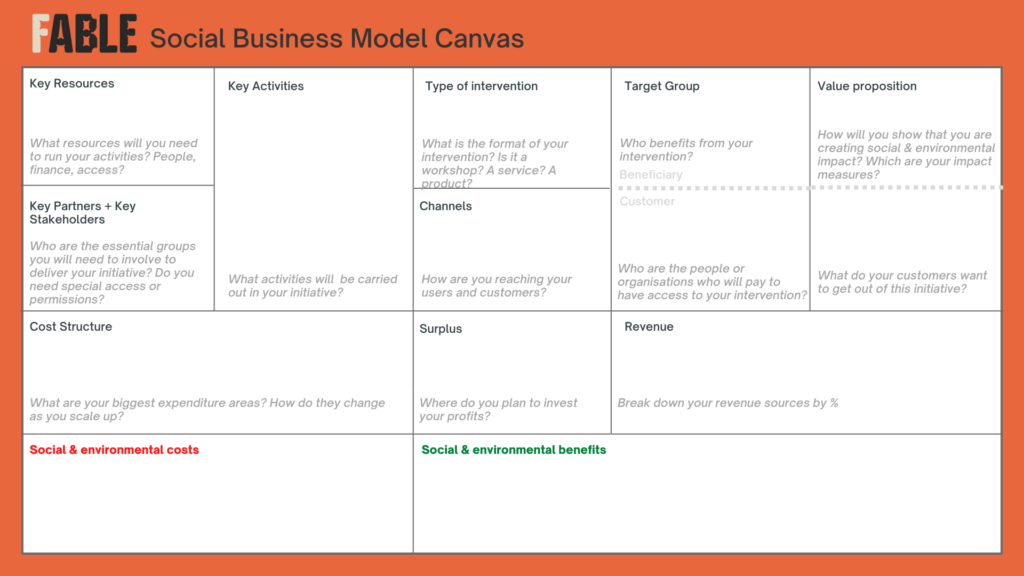
Now, imagine that the idea of a product is there or that the young people wish to implement a specific intervention that encompasses more than one distinct activity. Then, using the social business model canvas framework can be helpful for making a more detailed plan. Regardless if they are going to open an actual business or just build an indicative plan of what  could happen or what a sustainable fashion business should look like, such a process is very useful to develop young people’s critical thinking and creativity. So, try it step by step with your youngsters! And keep in mind that for each section of the following table, they can use different creative techniques to visualize their responses. They can even test the proposal’s attractiveness by doing a role play among them. But first, let’s see each section one by one.

Adapted from:

https://www.socialbusinessmodelcanvas.com

  • Key resources – any resource that supports the implementation of the intervention. It could be money, knowledge, skills, tools, places, etc.
  • Key partners and key stakeholders – it refers to individuals and organizations, including private and public institutions that can either support or hinder an intervention. Such people or organizations may have a particular interest in the intervention and its aims. Some of them might end up becoming partners and support the design and implementation of this intervention.
  • Key activities – it refers to specific actions that are required in order to realize the intervention. For example, if it is about creating and selling a fashion product, design, production, marketing, distribution, sales are a few activities that would be needed. If it is a youth center or a workshop, the activities might be related more to organization, networking, communication, knowledge and tools development.
  • Type of intervention – it describes the general type of your proposal. Although the template is called “business model” it can be used to draft an idea that is not related to business. In that case, benefits might be defined more abstractly since they are more difficult to measure if no money transactions are involved in this process. Regardless, these benefits are there and in fact, these make social interventions a very important element of our socio-economic systems and communities!
  • Channels – it involves the actual channels that will be used to contact the customers or users of the suggested intervention. These could be tools such as social media accounts and particular communication and dissemination strategies that could involve, for example, public events and the traditional media.
  • Target group – it refers to both the beneficiaries that can be impacted from the realization of the intervention and the actual users or consumers of the intervention directly engaged with it. The production (or not production) of a product can have a particular effect on certain people depending if they are the customers or the beneficiaries. If, for example, a business sells tote bags to raise money for child care services, the beneficiaries are the children and the child carers but the customers can be anybody. Similarly, if the intervention is related to a social or an environmental service, the beneficiaries could be part of a broader community that will be benefited from the positive impact of the intervention while the “users” would be the actual participants of this intervention. Think about a case where an environmental group cleans a beach. The participants of the group are directly involved but there are other groups of people (i.e. users of the beach, representatives of environmental NGOs, etc.) that benefit from a clean beach.
  • Value proposition – this part asks you to be more specific on the generated value or non-market benefits derived by the intervention. In the case of beneficiaries, it is related to the positive impacts generated by the intervention and in the case of users or customers, it represents the reasons for being interested in participating in the intervention or buying the respected product.
  • Cost structure – this part includes financial costs that are associated with the operation of the proposed intervention and are linked to all related activities.
  • Revenue – it is about the money raised during (and for) the operation of the intervention. Revenues could come from subscriptions, sales, fundraising, crowdfunding, investors, etc.
  • Surplus – when taking costs out of revenues, what is left is the surplus. You can decide how to allocate this surplus. Some options might include investments for increasing the scale of the intervention or, as it is quite common in social businesses, surplus could be used to organize social or environmental community activities.
  • Social and environmental costs & Social and environmental benefits – These two parts will help you evaluate the social and environmental impact of your intervention. If costs are higher than benefits, although these might not be explicitly measured, then maybe your intervention is not so socially and environmentally responsible. You might need to think about altering your approach. This could be about a product, a business in general or even a single activity. This part asks you to think very critically about your options and decisions. A product that uses eco-friendly materials to be produced, for example, might create negative implications (negative externalities) in other countries that are far beyond your reach. This means that the negative impact is not visible to you. Think for a moment about bamboo cups and plates. Bamboo might be considered a good option as a material to promote the reuse principle but this might cause overproduction and exploitation of bamboo plants (i.e. promotes monoculture) in countries far from our own. Canvas and its key activities section could shed some light on this matter by helping you look into all the different parts of the supply chain for a product. Check this article to understand these Bamboo controversies better. Similarly, deciding upon organizing a workshop to promote sustainability, if you end up using too much plastic and materials, or your participants have to travel very long distances, although you could do it online, then this is a red flag for the sustainable character of your workshop. Don’t fall into the trap of greenwashing!

After using this template and analysis, you can have an overview of important elements you need to consider when designing and planning an intervention, an activity or a business. The sixth chapter of this e-learning course provides you essential insights on how to assess and evaluate your intervention in the short- and long run. So, try to use such knowledge and tools in tandem.

Creativity

Exercises that work to strengthen creativity and interest in artistic endeavours.

Objectives

  • Increase sensitivity to art forms
  • Learning to visualize feelings and emotions
  • Improve abstraction and imagination skills
  • Use different art forms to express one’s opinion and thoughts
  • Apply the methodologies of Tinkering and Art-Based Learning

Preparation

  • Identify 2-3 songs (as a theme, young people)
  • Prepare tinkering materials
  • Set up a tinkering room

Total duration
2h

Description

  1. Participants listen to the proposed songs as a group
  2. Participants reflect on the ideas and images these songs evoked in the group. What emotions did it evoke? Does the song talk about issues that they feel are close to them? How do they feel about it? Do they agree with it, or do they have other opinions? Do they reflect on it, or is their reality far removed from the images told in the songs? How are young people represented in this song? And in contemporary music in general?
  3. Participants work on their own. From the group discussion time, they select an idea, an image, a feeling that most struck them about the song.
  4. Using the methodology of tinkering, shape the image they chose. Reflect on the feelings related to the song using the 5 senses. Maximum freedom in creating something that represents the complexity of their thinking
  5. Expose their creation to the group, telling the creative process, choice of materials, how they managed to recreate the image of their choice

Materials
Recycled materials (cardboard, cloth, buttons, thread, twine, branches, leaves…whatever!)

Objectives

  • Increasing intergenerational dialogue
  • Discover handicrafts
  • Becoming better acquainted with the culture of one’s community
  • Learning to visualize feelings and emotions
  • Improve abstraction and imagination skills
  • Apply the methodologies of Tinkering and Art-Based Learning and the concepts of Sustainable Fashion

Preparation

  • Identify the Narrator: a retired seamstress/tailor
  • Prepare salvaged materials
  • Set up a tinkering room

Total duration
2h

Description

  1. Participants listen to the Narrator’s own account of his or her craft as a group
  2. Participants reflect on the ideas and images these tales evoke in the group. What emotions did it evoke? What did they think about it? Did they already know how the craft works? Is it different from what they imagined it to be? What do they think the tailoring trade is like today? How does this relate to the consumerist model in clothing choice? What can be done to make these trades more valuable? What can be done so that they are not lost?
  3. Participants work on their own. From the group discussion time, they select an idea, an image, a feeling that most struck them about the song.
  4. Using tinkering methodology, shape the image they chose. Reflect on the feelings using the 5 senses. Maximum freedom in creating something that represents the complexity of their thinking
  5. Expose their creation to the group, telling the creative process, choice of materials, how they managed to recreate the image of their choice

Materials
Salvaged materials (cardboard, cloth, buttons, thread, twine, branches, leaves…whatever!)

Objectives

  • Increasing young people’s attendance at public spaces dedicated to art
  • Learning to visualize feelings and emotions
  • Improve abstraction and imagination skills
  • Apply the methodologies of Tinkering and Art-Based Learning

Preparation

  • Organize a visit to a city museum
  • Prepare reclaimed materials
  • Set up a tinkering room

Total duration
2h

Description

  1. Participants go on a visit to a city museum. They are free to walk through it and choose a work that most inspires them.
  2. Participants take time to analyze it: what feelings does it provoke? What materials is it made of? What colors have been chosen? Why did the artist choose those colors, those materials? What is the connection between the sensations it causes and whether it is a sculpture, a photo, or a painting?
  3. Participants take notes on all these reflections.
  4. In the tinkering room, participants tell which work they chose and the reflections connected to it.
  5. Using the tinkering methodology, recreate the emotions conveyed by the work. Use and reflect on all 5 senses: what tactile sensations? What are the sounds and noises it inspires? Maximum freedom in creating something that represents the complexity of their thinking: you can recreate it three-dimensionally, or in a rectangle, you can change its colors or composition if it helps them express themselves better.
  6. Expose their creation to the group, telling about the creative process, the choice of materials, how they managed to recreate the work of their choice.

Materials
Recycled materials (cardboard, cloth, buttons, thread, twine, branches, leaves, cotton,…whatever!)

During this group activity, participants will work in groups to create a fairy tale and perform it as a theatre. Objectives
  • Develop creativity
  • Improve teamwork and conflict resolution skills
  • Learn how to write a story
  • To promote self-confidence and flexibility
Preparation
  • Size of the group minimum 16 people, max 32
  • Prepare space for them to: – Work in groups and write the story – Work in groups on stage costumes and décor – Use as a stage to enact their fairy tale
  • Materials: – Instruction paper “Let’s write a fairy tale” – one for each group or person – Old clothes and accessories, as well as cartons, glue, scissors, sewing needles, pins, colour markers, papers, colour papers and anything else that you can think of might be useful for the tasks
Description
  1. To introduce the topic, the main characteristics of a good story/fairy tale are explained to the group. The Instruction paper “Let’s write a fairy tale” (Annex 1) is given to them.
  2. Afterwards, all participants are divided into groups of 3 to 5 people (preferably 4 people). We need between 3 and 6 groups.
  3. Each group has 15 minutes to write the plan of their story/fairy tale.
  4. Then their work is stopped and as a surprise every group has to pass its plan to the next group to write the details of the story. The work of the groups is stopped again at the 15th minute and a third group has to finalize the story again for 15 minutes.
  5. The finished story is handed to the next or the initial group to prepare and enact. Groups have 1 hour to work with the materials above and prepare their costumes and some improvised stage décor. If there is more time the participants may be given time to go out and find additional materials that they would like to use.
  6. In the last phase the groups enact their fairy tales as theatre plays. Depending on the group characteristics the facilitator may decide to give more time.
  7. Debrief and discussion. The facilitator may discuss some of the following questions: – How they felt when they had to give up their plan and start working on another story? – How they felt when they saw their initial story played? – Teamwork requires trusting and working together with other people. – Were they challenged when they were presented with the task to prepare costumes and décor with available materials and for a short time? – Did this help them find new creativity sources in themselves? – Were they happy with the results at the end? – What did they learn from this activity?
Total duration 3 – 6 h Materials Instruction paper “Let’s write a fairy tale” – one for each group or person; Old clothes and accessories, as well as cartons, glue, scissors, sewing needles, pins, colour markers, papers, colour papers and anything else that you can think of might be useful for the tasks

Writing fairy tales is easy: all you have to do is remember to include all the necessary elements, and in a certain order. Use this list.

Part 1: Plan and develop the action

  1. Usually starts with a problem that the character needs to solve
  2. Тhen there are complications and difficulties that the character must overcome
  3. Тhen the tension rises, …the villain approaches, … the hero prepares for the decisive confrontation
  4. Аnd then comes the fateful moment when the outcome of the tale is decided (the climax)
  5. Аt the end we have to give answers to all the questions that have tormented the reader since the beginning of the tale (who will inherit the kingdom, who will the princess marry, etc.).

Part 2: The details

  1. Describe the scene. Tell where and when the story happened.
  2. Identify the characters in your story. Give them names and personalities.
  3. Describe the limitation or problem.
  4. Clarify the characters’ intentions. What goes through their minds as they try to deal with the problem.
  5. Describe their actions. What did each of the characters do? Be specific, talk in detail.
  6. Include a surprise to make the tale memorable.

Objectives

  • Improve understanding and empathy among participants
  • Motivate recycling and second-hand use of items
  • Motivate creation of handicrafts and artworks
  • Foster collaboration, communication, and dialogue
  • Foster addressing of sensitive topics and interacting with new people

Preparation

  • Build pairs/smaller groups from the whole group
  • Each group should choose a topic they want to address (see Step 2)
  • Participants should prepare materials they can use (see Step 3)
  • Adhesive, pins, markers (if deemed necessary by the participants)

Description

  1. The group is split into smaller groups or pairs of 2-4 people. It is recommended to build groups with people they might be unfamiliar with.
  2. The group chooses a common topic, this can be a phase of their lives (e.g., childhood) or a specific event they all experienced (e.g., life during COVID-19, marriage, child birth, graduation, etc.). The group is then tasked with finding things at home or in nature which they can use for the project. This can be old clothes, materials they can reuse (e.g., old bottles, cereal boxes, etc.), materials from the forest or other outside locations, etc.
  3. The group brings their materials into the common space and is tasked with creating a piece together, inspired by their thoughts and opinions about their chosen topic. The final piece can be practical, for example, like new clothes or a bag, or it can be an artwork, for example, a statue or a canvas.
  4. In the end, the smaller pairs/groups present their final piece to the rest of the group, explaining their thoughts behind their creation.

Total duration
1h

Materials
Materials which can be re-used for a joint artwork or creation, adhesive, pins, markers / paint

Sustainability

These exercises are helpful to raise awareness on the topic of sustainability and sustainable fashion.

A group of young people will carry out an activity on the theme of sustainability and upcycling. The idea is that all participants sort out 1-2 old, no longer worn clothes or unused textiles and bring them with them. From the supposedly unusable textiles, something new is now to be created. For example: Bag, patchwork blanket or cover, scrunchie (hair tie), cuddly toy, keychain, … . There are no limits to creativity.

Objectives

  • Create awareness for sustainability
  • Gain self-efficacy experiences
  • Learn conflict and problem-solving skills
  • Linking methods of non-formal learning with practical exercises -> transferable added value for everyday situations
  • Critical examination of one’s own consumer behavior

Preparation

  • Prepare a room for a group of approx. 12 participants, equip with appealing sample materials and patterns
  • Gather knowledge about materials, techniques and equipment
  • Inform participants about the activity and materials to be brought along.

Description

  1. At the beginning, it is discussed with the participants whether everyone will use the textiles they have brought themselves or whether they will be available to everyone. If the latter is the case, these textiles can also be placed with the previously prepared materials. A short introduction to the use of the sewing machine follows. The facilitator then assumes their role and moderates the group through this activity without leading in any particular direction. Questions or the like are responded to in an understanding and impulsive manner.
  2. All participants familiarize themselves with the premises and available materials and patterns and gather impulses for their own project.
  3. It can already start! In individual work, creativity is given free rein and the old textiles are given a new lease of life.
  4. Finally, all participants are allowed to present their old new products and tell, for example, what challenges and surprises arose during the crafting, how the process from old to new felt, whether further ideas for upcycling projects want to be implemented, …

Total duration
2-3h

Materials
Fabrics, patterns, stuffing, scissors, sewing machines, needle and thread, tags, zippers, buttons

During this group activity, participants will work individually and in groups to create a collage. To introduce the topic, a suitable video is played (e.g. https://www.youtube.com/watch?v=xS3g8q5k5C4). After watching the video together, the group can discuss emerging thoughts, concerns and wishes in plenary. Finally, all participants sit around a large (round) sheet and begin to create. In the end, a globe is created with the collected works of the participants. This activity is concluded at the end with the evaluation sheet.

Objectives

  • Create awareness of environmental and sustainability issues.
  • Strengthen teamwork, conflict resolution, and critical thinking skills
  • To be able to visualize needs, concerns and ideas
  • To promote self-confidence and flexibility

Preparation

  • Prepare space for a group of about 12 people, provide (recycled) craft materials.
  • Select and review appealing video material for the target group
  • Prepare final questionnaire

Description

  1. All participants gather to watch a video on the topic of environment and sustainability. Afterwards, emerging impressions and emotions are discussed. The facilitator assumes their role and moderates the group through this activity without leading in any direction. Questions (and the like) are responded to with understanding and impetus.
  2. Afterwards, all participants gather around a large table with the round sheet and start creating the collage. The arrangement and design of the collage is the sole responsibility of the designers.
  3. After the design, the participants are again given the space to exchange their thoughts and ideas and explain their part of the collage. Each participant comments on the overall result.
  4. Finally, the final questionnaire is handed out and filled out.

Total duration
2h

Materials
Natural materials (sticks, leaves, nuts, moss, …), recycled materials (textiles, plastic, leather, …) Paper, glue, pens, scissors, device for playing the video, Internet

Objectives

  • To create awareness for sustainability
  • To link methods of non-formal learning with practical exercises
  • To reflect on one’s own consumer behavior

Preparation

  • To inform participants to bring clothes they have in for this activity. (different types of clothes, min. 10 pieces each)
  • To print a blank map of the world for each group.
  • To prepare a box with pencils for drawing.

Description

  1. Activity starts with discussion in a big circle. Participants are asked how often they buy clothes and in which shops. After approximately 10 min. of the discussion, they are told they will be divided into groups of 4-5 people to examine the origin of the clothes they are wearing and they will be given the instructions.
  2. In smaller groups, one by one, they can read the labels from their clothes and do a bit of research in order to identify where their clothes were made. They can mark the countries with different colors on the map – for example one color for T-shirts, different for trousers… This part should take approximately 20 minutes.
  3. Participants return to the big circle and one person from each group shares their maps. A discussion about the carbon footprint of the clothes and more sustainable alternatives can follow.

Total duration
60 minutes

Materials
1 blank map of the world per group, colorful pencils.

Objectives

  • To raise awareness about the problems associated with the fast fashion industry in a playful way.
  • To propose more sustainable solutions for clothing.
  • To learn how to work in a group.
  • Preparation
    To print/prepare 3 pieces of paper with the title of the play. The titles are the following:
    – The environmental impact of fast fashion
    – Basic human rights violation in factories for fast fashion
    – Slow fashion as a more sustainable way of clothing

Description

  1. Activity starts with discussion in a big circle. Participants are asked if they know a difference between fast fashion and its alternatives – circular fashion, locally produced fashion, zero or low waste design. After approximately 10 min. of the discussion, they are told they will be divided into 3 groups. Each group receives one topic.
  2. In smaller groups, participants brainstorm about the topic. Their role is to create a short play for children about the topic. The point is to present the topic in a simple and playful way. This should last approximately 40 minutes.
  3. Each group then presents their play. The maximum limit for each play is 10 minutes.
  4. Participants return to the big circle and the discussion about the process can follow. Here are some of the ideas for the follow-up questions:
    – What did you learn in this activity?
    – How was the process of creating a play for you?
    – Were there any times when you felt stuck? How did you overcome it?

Total duration
90 minutes

Materials
Instructions with the topic printed for each group

This activity has the dual goal of both young people learning the basics of a craft (to spark their interest in it) and figuring out how to use artifacts created through it to relive old clothes and accessories, so that they look more fun, fancy and new.

Objectives

  • Create awareness for sustainability
  • Gain self-efficacy experiences
  • Learn the basics of a craft related to fashion (for ex. embroidery, knitting)
  • Critical examination of one’s own consumer behavior

Preparation

  • Prepare a room for a group of approx. 12 participants, equipped with appealing sample materials and patterns (created with the craft of choice ex. Embroidery)
  • Find an experienced craftsman to tell the group about the art of embroidery and show materials and samples
  • Gather materials, example cloth, threads, needles
  • Inform participants about the activity and materials to be brought along
  • If they want they can also bring old clothes bags or other items that they want to make look more interesting.

Description

  1. At the beginning, it is discussed with the participants whether everyone will use the textiles they have brought themselves or whether they will be available to everyone. If the latter is the case, these textiles can also be placed with the previously prepared materials.
  2. An introduction about embroidery follows.
  3. Next the craftsman teaches the group basic embroidery techniques and they try them out and practice for some time.
  4. Then the participants think of their own design of embroidery, choose appropriate material to do it on and the right threads. They do all of this with the help of the craftsman. The idea is for them to create a small embroidery piece that they can use to enliven the old piece of clothing, bag or whatever they have brought with them.
  5. Next, they may make the embroidery and sew it to the fashion item during the workshop with the help of the craftsman or they may do it at home (this is depending on the time that they have)

Total duration
4 – 8 h

Materials
In case of embroidery: suitable cloths, needles, threads, scissors, papers to draw the designs, tables to work on.

Objectives

  • Foster intergenerational dialogue
  • Be inspired to take more interested in slow fashion
  • Motivate hand-made clothes making
  • Foster understanding and empathy
  • Foster intercultural dialogue
  • Learn about different kinds of handicraft

Preparation

  • Materials which the participants want to make the presentation with

Description

  1. Each participant is tasked with asking their grandparents, parents, other older relatives, or acquaintances about their fashion related behaviour in their generation:
    “How did you acquire new fashion?”
    “Did you make clothes yourselves?”
    “What did clothes look like in your generation?”
    “What materials were clothes made of?” etc.
  2. Each participant is then tasked with making a presentation about what they have learned to the whole group. This presentation can include a storytelling, a presentation of clothes they made themselves based on the learnt stories, or other kinds of presentation (collage, etc.)
  3. If possible, the presentations can later be presented in a group exhibition, showing how fashion has evolved over the years.

Total duration
2h

Materials
The materials needed to make the presentations with

Part 4: Methodologies for sustainable fashion and social entrepreneurship as role play to learn problem solving, critical thinking and time management

Part 6: Monitoring and assessment tool for activities with young people